
Looping Chalices
As I watched the mercury drop further and further and appear to pick up speed on its way down, I knew I needed a hat! Hats and I do not get along very well .. I just do not look good in them. After much thought and discussion, it was decided to try to a beret / slouch type hat and this is what I came up with.
This is actually a hat that was intended for use with recycled yarn - the yarn I used has a 15% wool content and is fuzzy-ish, so the yarn weights here may vary if you use a new yarn - It knit up very fast (2 days) and is a little big on me, but I've a small head - My first hat pattern and I've had a lot of fun making it! I hope you have as much fun as I did making it! needles: US10 DPN or 2 circulars
stitch markers
weight: worsted or sport / Dk double stranded
size: average
Glossary:
yf: bring yarn from back to front
sl 1: slip 1 stitch from left to right needle
psso: pass slip stitch over
CO 75 sts, working one row ribbing for 1"
Increase row: increase 1 stitch every 3rd stitch (96 sts on needle)
2nd increase row: increase approx every 3rd - 4th stitch (123 stitches on needle)
Pattern Stitch
1st Row: (right side) K2, yf, k1, sl 1, k1, psso, k3, k2tog, k1, *(yf, k1) twice, sl 1, k1 psso, k3, k2tog, k1; rep from * to last 2 sts, yf, k2
2nd and alt rows: K
3rd Row: k3, * yf, k1, sl 1, k1, psso, k1, k2tog, k1, yf, k3; rep from * to end
5th Row: k4, yf, k1, sl 1, k2tog, psso, k1, yf, * k5, yf, k1, sl 1, k2tog, psso, k1, yf; rep from * to last 4 sts, k4
7th Row: k2, k2tog, k1, yf, k3, yf, k1, sl 1, k1, psso, *k1, k2tog, k1, yf, k3, yf, k1, sl 1, k1, psso; rep fro * to last 2 sts, k2
9th Row: k1, sl 1, k1, psso, k2, yf, k3, yf, k2, *sl 1, k2tog, psso, k2, yf, k3, yf, k2; rep from * to last 3 sts, k2tog, k1
11th Row: k3, * k2tog, k1, (yf, k1) twice, sl 1, k1, psso, k3; rep from * to end
13th Row: k2, k2tog, k1, yf, k3, yf, k1, sl 1, k1, psso, * k1, k2tog, k1, yf, k3, yf, k1, sl 1, k1, psso; rep from * to last 2 st, k2
15th Row: k1, sl 1, k1, psso, k1, yf, k5, yf, k1 * sl 1, k2tog, psso, k1, yf, k5, yf, k1; rep from * to last 3 st, k2tog, k1
17th Row: k3, * yf, k1, sl 1, k1, psso, k1, k2tog, k1, yf, k3; rep from * to end
19th Row: k3, *, yf, k2, sl 1, k2tog, psso, k2, yf, k3; rep from * to end
20th Row: Knit
Complete 2 sets of pattern stitch.
Decrease Row 1: K1, K2tog - rep these 2 stitches until end
Decrease Row 2: K
Repeat these rows 3 times
Decrease Row 7: K1, K2tog - rep for one round
Using a yarn needle and tail from yarn, draw yarn through stitches to close hole, weave in ends and enjoy! Block if needed.
PDF Links:
grace quilts website
Google Docs
Doc Stock Profile Page
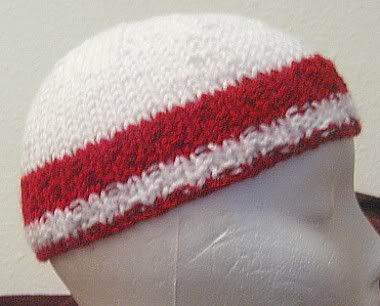
The stripe pattern is based on a (very short) Fibonacci sequence, where each set of 2 rows equals 1. (It's okay if that didn't make sense. If it did, Math Geeks Unite!!)
The hat is knit in the round. I used two circular needles to do this, but if you're more comfortable with the magic loop method or DPN's, go for it. I won't be looking over your shoulder, so you can just go wild and I'll never know. Descriptions and videos of these methods can be found here, at KnittingHelp.com.
Size: 19.5"/49,5cm unstretched, up to 23"/58,5cm stretched
Style: Brim to Crown
Gauge: Stockinette stitch in the round 4.5 stitches per inch, 6.5 rows per inch (18 sts/26 rows = 4"/10cm)
Needles: 2 circulars, Size US 10/6mm
Yarn: Red Heart (worsted, light worsted); much less than one skein for main color (MC) and contrasting color (CC)
Abbreviations
K2tog: knit 2 together; RS: right side; ss: stockinette stitch; sts: stitches
Row 1: Cable cast on 72 sts with CC. Join, being careful not to twist stitches.
Row 2: Place marker at the beginning of the round. Knit 2, purl 1. Repeat to the end of the round.
Row 3: Change to MC. Try the jogless join, or just join how you normally do - it's not going to make much of a difference in the look. K2, p1 to end of round.
Rows 4-5: K1, p1, *K2, p1*. Repeat * to * to last stitch. End with K1.
Row 6: K2, p1 to end of round.
Row 7: Change to CC. K2, p1 to end of round.
Rows 8-9: K1, p1, *K2, p1*. Repeat * to * to last stitch. End with K1.
Row 10-11: K2, p1 to end of round.
Row 12: K1, p1, *K2, p1*. Repeat * to * to last stitch. End with K1.
Rows 13-23: Change to MC. Knit ss for 11 rows.
Row 24: K6, k2tog. Repeat to end of round.
Row 25: K to end of round.
 Rows 26-35: Continue decreasing (k5, k2tog; k4, k2tog etc.) separating each decrease row with a 'plain' knit row.
Row 36: K1, k2tog to end of row.
Rows 37-38: K2tog to end of row.
You should end up with 8 stitches to finish off, and a cool swirlish decrease pattern.
Cut the yarn, leaving 6-8" for sewing up and weaving in.
Sewing up isn't as terrible as it sounds. Using a yarn needle, thread the yarn tail through the 8 sts as you remove them from the needle(s) and pull it up tight to close the hole. You can tie an itty bitty knot in there somewhere if you want and then weave in the yarn tail. Or you can be more traditional and skip the knot, just doing a bang-up job of weaving in. Again, I won't know.
If you have any other ends, weave them in, too. (Yes, you could have figured that out for yourself, but I'm pretending that this is a "real" pattern!)
